|
|
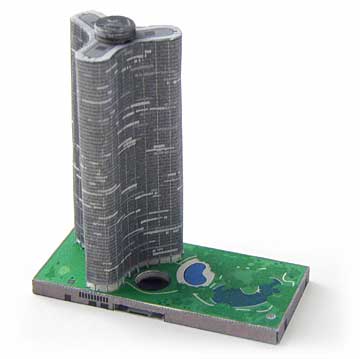 Lake Point Tower
 |
Start your model by cutting out the apartment tower. Cut carefully around the tiny pillars at the bottom. If you find they are easily mangled and bent, you can strengthen them with a tiny drop of super glue on the back of the pillar (see Tips & Techniques). |
|
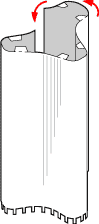 |
Bend the walls of the tower around a pencil or dowel to create a 3-sided clover shape. The seam of the tower piece will be in the center of one of the concave sides of the tower, as shown with an asterisk, while the lighter shading on the walls indicates where the three outer lobes of the tower should be.
Look at the 3-lobed rooftop piece and note that the ends of the three outer lobes are not perfectly circular: the end of each lobe has a flat spot. Use a small rod or dowel to create a tight curve to match the shape of the rooftop piece.
Once you have shaped the walls completely, glue the ends of the piece together to make a 3-lobed cylinder. |
|
|
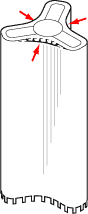
Cut out the rooftop piece with the shaded circle in the center. Score and fold the tiny flaps and then fit it into place inside the top of the walls. The flaps on top of the walls will keep the rooftop flush with the top of the building. These flaps should fit into the gaps between the flaps on the rooftop piece.
You may want to glue the tabs at the outer ends of the three lobes first. Once they are dry, apply some glue with a toothpick to the flaps at the concave parts of the roof and press inwards with your fingers to push the walls in to match the curve of the rooftop. Reach underneath the piece with a chopstick to apply some pressure to the flaps on the inside against your fingers on the outside. |
 |
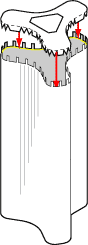 |
After the glue in the previous step has dried, cut out the bottom piece with the hole in the center and glue it into place just like the rooftop piece. The hole in the center will allow you to pull the piece up or push it down to line it up flush with the bottom edge of the walls. |
 |
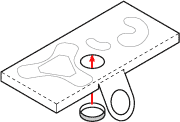 |
Next, cut out the rectangular park piece. Score and fold its sides down to create a raised platform. Curl the thin strip of brown (next to diagram #3 on the postcard) to make a low cylinder with the printing on the inside. Glue this piece underneath the platform under the round hole. |
|

|
Cut out the driveway entrance to the parking garage. Fold the side walls up and bend the far wall around so that the printing is on the inside. |
 |

|
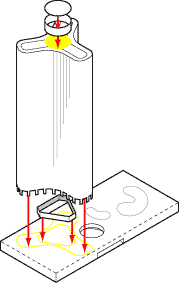
Fold the roof of the entrance to the parking garage up. The hole should match up with the hole in the platform above.
Then, glue the driveway in place. |
|
|
Next, cut out the triangular lobby of the apartment tower. Glue this in place in the shaded area on the platform.
Then, glue the tower in place on top of the lobby.
Finally, cut out the cylinder and roof for the revolving restaurant and place it on top of the tower. |
|
And now your model of Lake Point Tower is finished! |
|