|
|
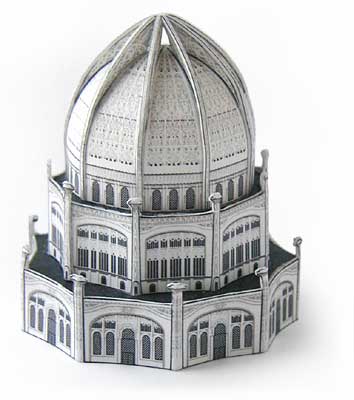 Bahá'í Temple
 |
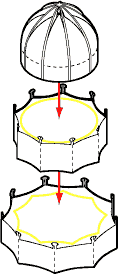
To start the model, cut out the nine-sided dome. Only the tiny flaps at the tips of the dome sections are scored and crisply folded. To shape the rest of the piece, use a round pencil or dowel to create the smooth inward curve of the dome. Bend the triangular pieces downward around the pencil to curl them inward. The more evenly and tightly you curl the dome sections the more smoothly the dome will fit together.
Next, gently curl the entire dome piece around on itself horizontally to make a cylinder. Wait until the glue has dried before bending the top of the dome inward in the next step. |
|
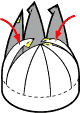 |
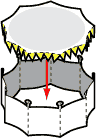
Now, gently push each triangular dome section inward, tucking each flap at the end underneath its neighbor as seen in the diagram below. You may want to put glue on the flaps before tucking them under each other, or you may want to add the glue with a toothpick after the sections have all been bent into place, if you are having trouble with messy glue.
Once all the sections and flaps are in place, flip the dome over and press down gently from the inside with your finger to push the tabs flat on the inside of the dome. Don't worry if there are some small visible gaps in the seams between the sections on the sides of the dome. These will be covered by the buttresses in the next step. |
 |
 |
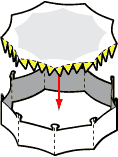
Carefully cut out the 18 buttresses and glue them to their mirror image pieces. |
|
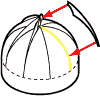 |
Then glue each of the 9 completed buttresses in an upright position covering the seams between the dome sections. Each buttress has a tiny flat end at the top where all 9 meet above the center of the dome. |
 |
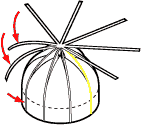 |
Cut out the nine-legged spider-like buttress covering. Run a little strip of glue along the top edges of the buttresses and then set the spider in the center of the dome, aligning each leg atop each buttress. Once you have glued the center part in place, you can add a little glue along the underside of each leg and press it down in place. If there is a little extra of the strip hanging over the bottom edge of the dome, trim it flush with the bottom edge of the dome. |
|