Build Your Own Chicag
About the Cards
Photo Gallery
How To Build It
Tips & Techniques
Read More About It
Free Models
Order Cards
Picasso modelPicasso Sculpture
Cut out the large section of the sculpture with the "ears." Cut out the interior portion between the ears, but be very careful not to cut the ears from the body of the piece. Cut out the slot at the front of the square section just large enough for the neck piece to slide into. Cut another small slot or notch at the top of the ears where the top of the neck will fit. Bend the ears backwards at their middle and the fold in the square section forwards to create roughly a 135-degree angle.
Cut out the neck piece and fold in the two places indicated. Slide the bottom part of the neck piece into the slot in the square section and glue it to the underside of the square section. Place a drop of glue at the top of the neck section and insert it gently and just barely in the small notch at the top of the ears.

Cut out the neck support and bend the glue tabs upwards. Fold along the center line and glue to itself to create a triangle shape with the glue tabs forming a plane at the front of the piece.
The next piece is the hardest part of the model, proceed slowly and carefully!

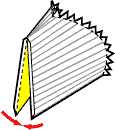
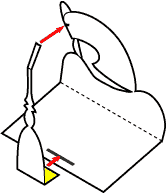
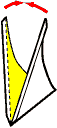
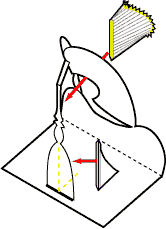
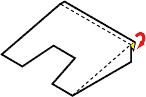
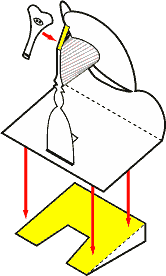
Cut out the "rib" section. Score and fold the narrow glue tabs (on the inside edge of the piece) upwards. Score and fold all the small triangles on the outside edge upwards. Now, gently roll the outer edges of the piece against a round object, such as a pen, to give the piece a curve. Go back and forth to gradually curl the paper into a sort of cone. You are trying for a squashed cylinder shape. The outer edge will be curled, while the inside edge is folded against itself to make a straight line.

Once you have a shape that seems right, see if it will fit between the ears and touch the back of the neck of the sculpture (with a little gentle pressure). Then, glue justs the corners of the straight edges to each other, taking care not to glue the cone flat. Do not glue the flaps to each other: they should remain facing forward just like the neck support piece you just completed above.
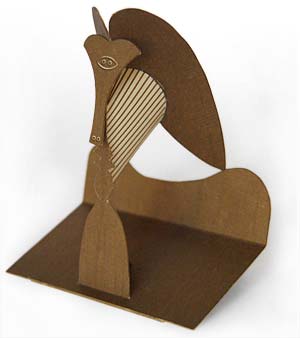

Place the neck support piece behind the neck (fig. 4). The glue tabs on the support should connect to the neck, while a little glue along the bottom of the support will secure it against the large square piece. There is a thin white line on the square piece which shows the correct position of the support. When the support is dry, the neck will be much sturdier and be set at the correct angle.

Then you may glue the ribs to the sculpture. The glue tabs should connect to the back of the neck piece just like the support above, while the small triangles on the curved outside of the piece will be glued to the back of the ears.


Cut out and fold the base of the sculpture.
Glue the square piece to the base. Look underneath the model and center the base on the bottom of the square piece.

Finish the sculpture by gluing the head in position. Add a little drop of glue to where the head meets the ears to make that bond stronger.

Read more about the Chicago Picasso Sculpture