
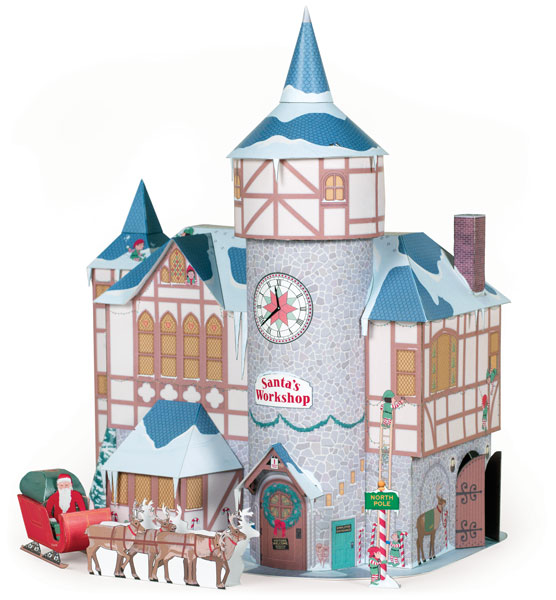
If you are seeking a greater papercraft challenge, you can modify your model of Santa's Workshop in a number of different ways rather than building it straight "out of the box". Here are some ideas for customizing your miniature workshop model or making other projects:
Santa's Workshop ornaments Add a string to hang these small extras from the workshop on your tree. If you are only building the exterior of the workshop you may not need the forklift or sleigh for the workshop display. |
|
|
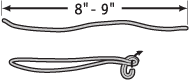
Find some colorful string or thin ribbon. Cut the string to a length of 8 or 9 inches. Fold over and tie the end in an overhand knot. |
|
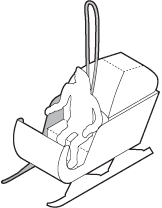
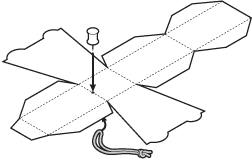
Cut out the sleigh body, score and fold along the dotted lines. Before assembling the sleigh, use a thumbtack, pin or needle to poke a hole in the top panel of the sleigh. Poke the hole near the center of the fold line. Enlarge the hole just enough to push the loop of the string through to the knot. You can glue the knot end of the string to the inside of the sleigh, if you like, to make sure it doesn't pull through the hole accidentally. |
|
Assemble the rest of the sleigh according to the instructions. The loop of string should come out just behind the back of the seat and in front of Santa's sack of toys. Now Santa's sleigh is ready to hang on the tree! |
|
Cut out the forklift chassis and simple forklift mast. Score and fold the pieces along the dotted lines. Before assembling the forklift, use a thumbtack, pin or needle to poke a hole in the roof near the front fold line. Enlarge the hole just enough to push the loop of the string through to the knot. You can glue the knot end of the string to the inside of the forklift, if you like, to make sure it doesn't pull through the hole accidentally. |
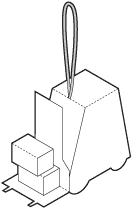 |
Assemble the rest of the forklift according to the instructions. You may wish to put a drop of glue between the base of the forklift mast and the chassis to lock the mast in place so that it doesn't tip too far forward. Glue a few gifts to the front platform. Now the forklift ornament is ready to hang on the tree! |

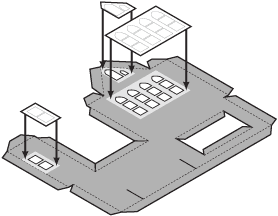
Windows for Santa's Workshop You can add a lot of charm to your tiny Santa's Workshop model by cutting out the openings for the little windows. Gather all the extra windowpane pieces from the first few pages of the book and copy them together onto a sheet of thin paper or clear mylar for translucent or transparent window panes. If you are making only the exterior of the workshop, you can place flickering LED tea lights or colored Christmas lights inside the building to shine through the windows for a homey effect. If you are building the interior of the workshop, use mylar window panes so that viewers can peek inside the rooms of the workshop from the front of the building. |
|
|
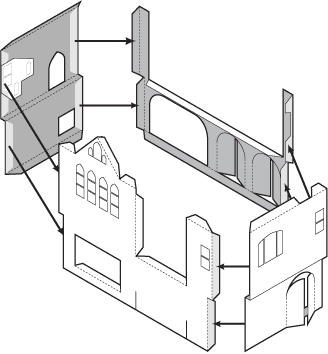
Cut out the wall pieces as described in the instructions. Score and fold the tabs. Before assembling, glue the window panes in the correct places to the back of each wall. Look at the front of each piece to make sure the window panes are in the right spot before the glue dries. Press the exterior walls flat under a heavy book while the glue dries. Mylar transparency can be a difficult material to glue to paper. Super glue or contact cement can be used, or simply a little tape at the edges to secure the window panes in place. For the front door window on the tower, glue or tape the window in place after the tower is rolled into a cylinder.
|
|
When assembling the walls, some of the tabs may need to be trimmed slightly so that they do not cover the window openings. Continue on as described in the instructions, adding window panes behind the annex walls and tower in the same way as the four large walls. If you are putting in transparent mylar windowpanes on the front door, annex, and first floor of the tower, you may wish to add colored paper behind the window since there is no view into the rooms from these lower windows. |
|
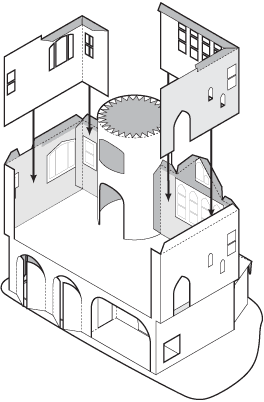
Cut out the window openings on the interior walls. Glue the interior walls in place carefully so that the openings match up on the inside and outside. If you are adding transparent mylar windows, you may wish to color the clothing on the back of the elves before assembling the work tables, so that the blank white paper on the back isn't visible to viewers peeking in the windows. Place a few LED tea lights inside the workshop to light it up at night. |
Other ideas to add detail and character to Santa's Workshop Place white felt around the model or on the rooftop to surround the workshop with deep snowdrifts. Search your local hobby store or dollhouse shop for miniature bottle-brush trees to plant a natural habitat around the workshop model. Tiny colored LED lights such as those sold as novelty light-up necklaces can be attached to the walls and balcony of the main workshop, or to the exterior as real working Christmas lights for the model. Stock the workshop with your own tiny toys from vending machines or dollhouse stores. Add your own figurines and action figures to populate the busy workshop with all the animals and citizens of the north pole. |
|
 Order the Santa's Workshop model book
Dover Publications, 2017: ISBN 978-0-486-81902-0. Paper model ©Matt Bergstrom, Wurlington Press