Step 1: The Art of Paper Model Instructions
One of the intriguing things about paper models is the process which transforms a 2-dimensional surface into a 3-dimensional object. The paper does not transform itself, of course. It must be put together by human hands. But how do you figure out how to fold and connect the flat paper shapes to create a fully-formed model?
Roubené stavení z Korořinska instructions, Richard Vyškovský, ABC magazine, 2001
Depending on the design and complexity of the model, it may quite difficult to figure out the correct steps for assembly. If the model kit is from another country, and you do not speak the language of the model designer, written tips or instructions may not help much.
Early model kits from the nineteenth century rarely provided much instruction to explain their assembly.
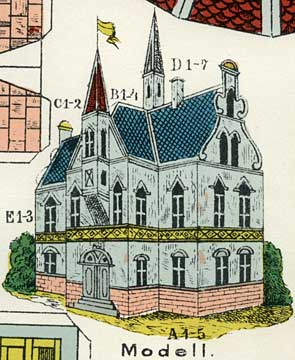
Most often, an idealized illustration of the model shows the final product without indication of the steps necessary to build it. Occasionally there may be letters indicating the general location of parts, but does the little picture show the completed paper toy or the full-sized original subject? No doubt the children who built these models learned quickly and intuitively how the kits should be assembled, and the illustration was sufficient.
Visual Symbol Languages
In the early twentieth century, modernist graphic designers began experimenting with streamlined graphical languages to convey complex ideas in a glance. In today's world, globalization has strengthened and spread this visual lingua franca of trade and travel we are all familiar with. There are variations in visual dialects from place to place but most of these symbols have a universal meaning.
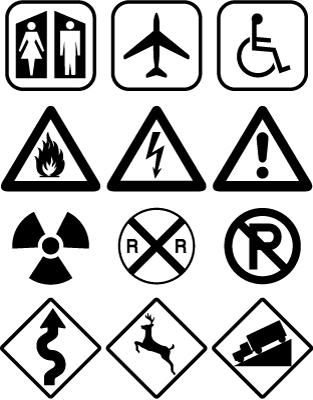
For other ideas, there is not yet a consensus on which visualization is the best, and each time a sign is made, the artist must struggle to show the idea or process in an understandable way.
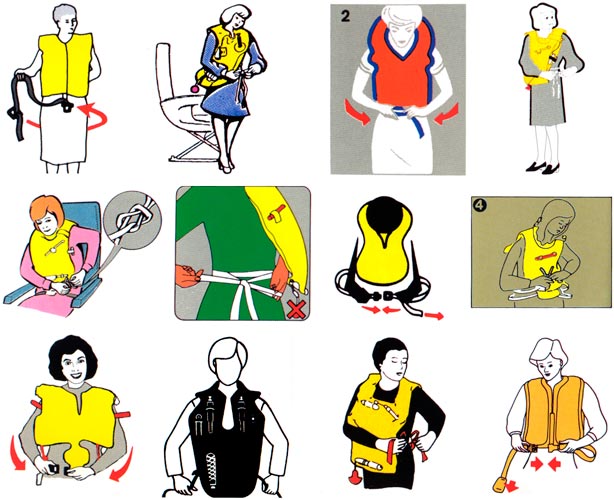
Life vest instruction variations from Open Here: The Art of Instructional Design, Paul Mijksenaar & Piet Westendorp, Joost Elvers Books, 1999
How many ways are there to put on a life vest? How many ways are there to explain how to put on a life vest? The wide variety of ways to explain the same thing can provide a lot of fun for the collector of information graphics. Some pictograms are clever, others obtuse. Some are appealing, while others are quite homely. Even a clumsy graphic can be beautiful and interesting if it has a unique way of explaining an idea.
Another graphic innovation of the early twentieth century is the comic strip. A repeated frame and repeated image within the frame leads us to understand that time has passed from one frame to the next. It is so common it is barely noticed by us nowadays, but the comic strip speaks in its own complex visual language, with arbitrary symbols for movement and for spoken or internal dialogue.

In our industrial era, we are surrounded by complex mass-produced consumer items. Many of these objects were created using step-by-step instruction diagrams, whether used by a factory worker on a production line or by the consumer assembling at home. From an early age we are trained to understand that these diagrams describe how the world is put together in orderly and simple steps. A well-designed instruction diagram needs no words for a child to understand how this toy fits together.
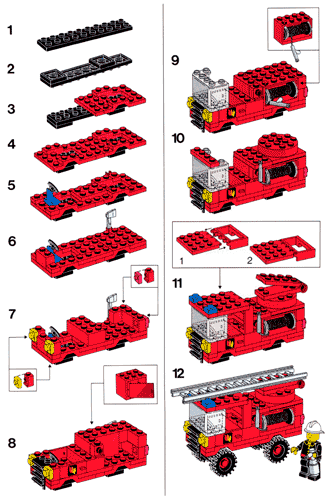
Lego 6366 Fire and Rescue Squad instructions, 1984
Symbol Language or Logic Puzzle?
Despite the familiarity of these diagrams, when it comes to paper models there is no international standard for explaining how to build them. Some paper model designers seem to view the assembly as a sort of logic game, where you must match one number or symbol to a corresponding number or symbol to figure out where or how the pieces connect.
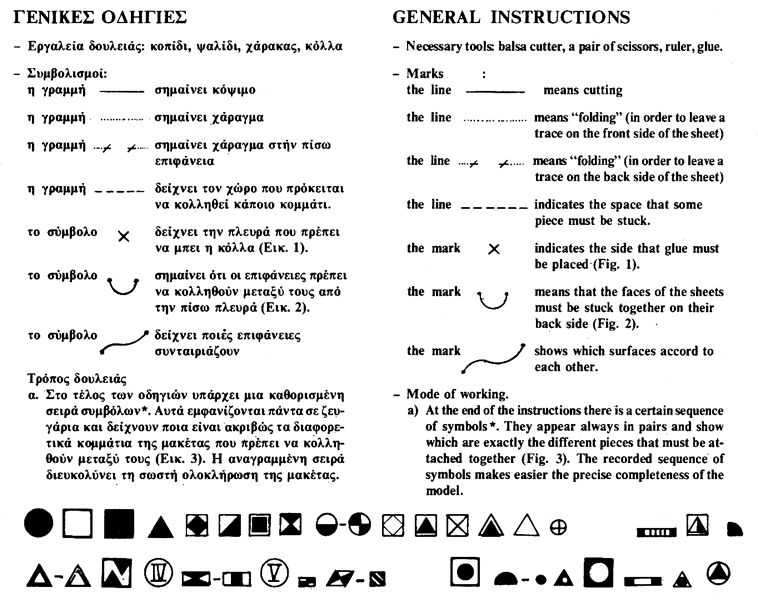
Cyclades Sifnos: House Ensemble Kit instructions, Nikos Soulakis, 1982
The symbols used are not often consistent from one designer or publisher to another, requiring a unique key on each kit to explain what the symbols mean.
Robie House instructions, Victor Veldhuijzen Van Zanten, Uitgeverij Thoth, 1989
Some paper model artists have created unique symbolic languages which have become influential regionally. Czech designer Richard Vyškovský devised an elegant system of oversized bubbles and corresponding little numbers to indicate where pieces should be placed which is used on all his many designs.
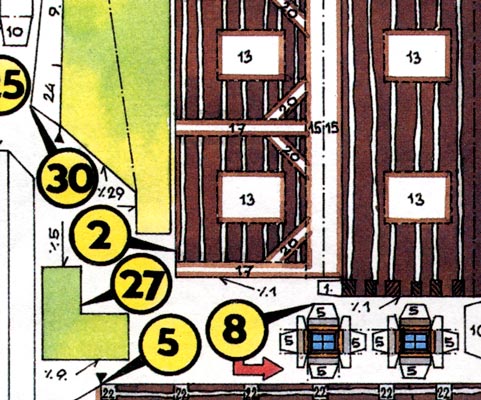
Roubené stavení z Korořinska detail, Richard Vyškovský, ABC magazine, 2001
In general there are several ideas that the paper model instructions must communicate. Firstly, where to cut each piece and how to fold it (forward or reverse folds which are known in origami as mountain and valley folds). Secondly, where and how to connect the pieces together. Thick or thin outlines, dotted or dashed lines, line colors and flat shades can all be used to show these ideas as well as extra symbols such as numbers, letters, scissors, arrows, x's, and other more obscure marks such as the % symbol in the model above.
Chusonji Konjikido instructions, Toshimasa Mitsutake, Shubunsha, 2000
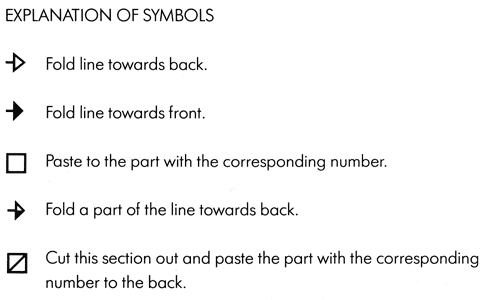
Some systems of symbols are more commonly used than others, but there are no agreed-upon standards. Its easy to find examples of the same symbols used for opposite meanings in different paper model kits. Mountain folds may be shown by a dotted line in one kit, a tiny arrow in another, or not even indicated at all in another. Most kits use solid lines to indicate where the pieces should be cut out, but some use dashed lines instead. Without a key to the symbols used in these particular kits, can you figure out how the following random pieces should be cut apart and folded?
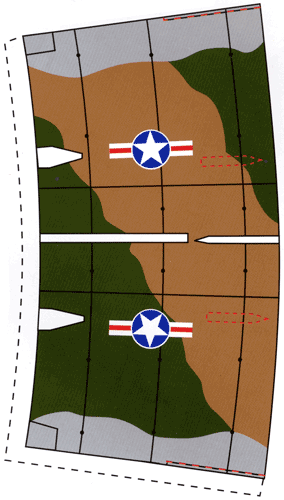
Thunderchief F-105 detail, Hillel Ben-Yosef, Random House, 1997
Trabant 601 detail, Vorpommern Bastelbögen, 1998
Robie House detail, Victor Veldhuijzen Van Zanten, Uitgeverij Thoth, 1989
Les moaïs de l'île de Pâques detail, Editions Pascaline, 1990
Like all symbol languages, the message is easiest to read when it relates in some way to the real world. The symbols that explain the paper model pieces should help you imagine or visualize how the pieces are folded and fit together even before you physically cut them from the page.
Visualization of Form
The confusing babel of symbols used on paper models means that most kits require some kind of extraneous instructions to help explain how the parts fit together.
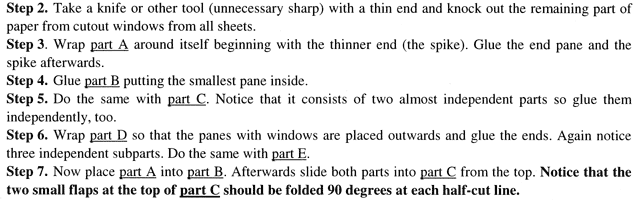
One method of instruction is to write out descriptions of the steps for assembly. This is the easiest way to create instructions but also the most limited. If you don't speak the language or the ideas are not clearly expressed, written instructions may be frustrating or not helpful.
Empire State Building instructions, Paper Landmarks
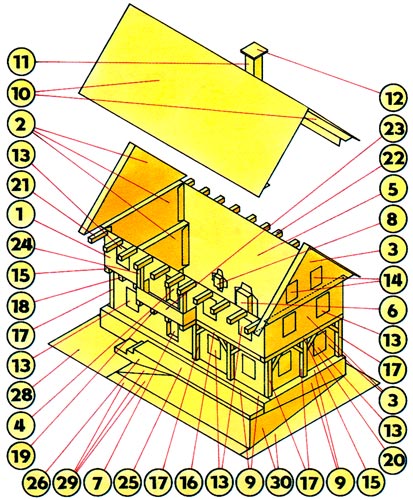
If the model is simple enough its assembly can be explained in one single diagram. The exploded diagram below uses images, shades and arrows to show the spatial arrangement of pieces and places to add glue, while the numbers show the order in time in which they are assembled.
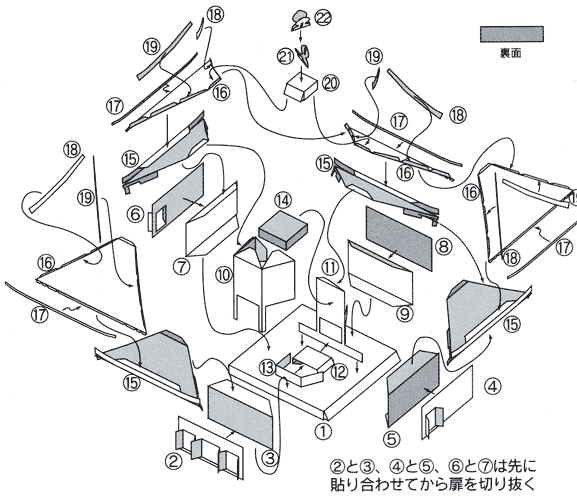
Chusonji Konjikido instructions, Toshimasa Mitsutake, Shubunsha, 2000
For more complex models, the assembly is usually broken down into steps. One scheme is to pair written instructions with a visual to compare against for each step. If your model doesn't look like the one in the picture at the end of the step, you've done something wrong.
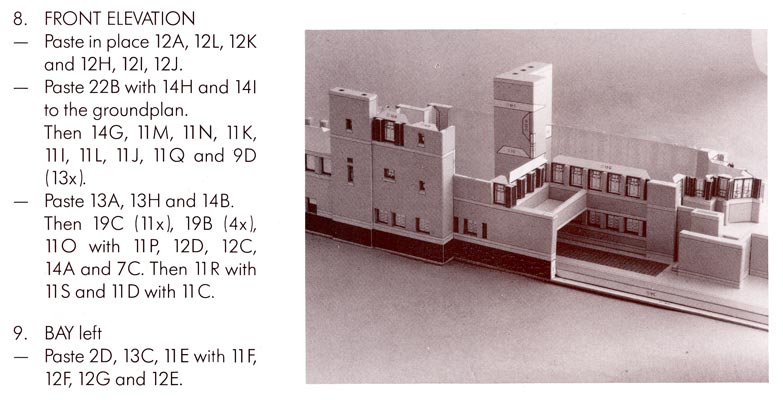
Robie House instructions, Victor Veldhuijzen Van Zanten, Uitgeverij Thoth, 1989
Written instructions with line diagrams can be more precise than photographs. The following example has several levels of complexity: numbered steps, written instructions in several languages, colors to indicate where to glue, arrows to show how to fit the pieces and numbers to indicate the order to assemble them.
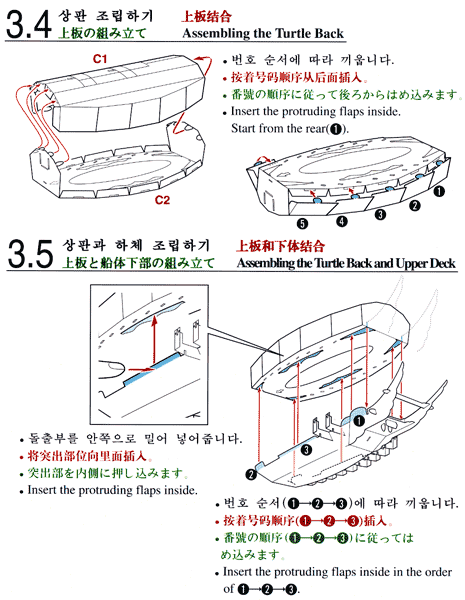
Turtle Ship (Small) instructions, Paper Magic, 1998
At the extreme end of expository completeness, some model kits include so many cautious diagrams, numbered and lettered steps and substeps that the instruction booklet requires more pages than the model itself.
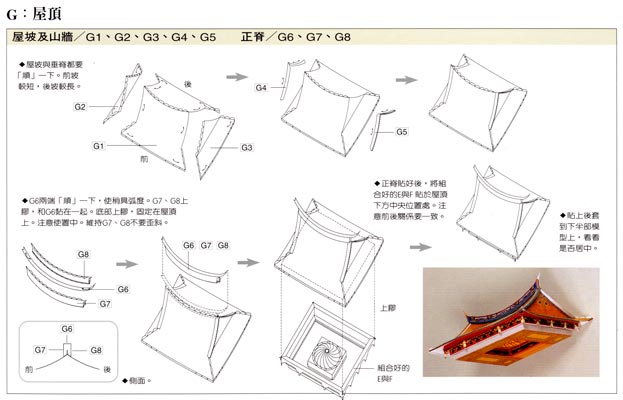
Build the Main Hall of Wanhua Longshan Temple Yourself, Cai Mingfen, Yuanliu Publishing Co., Ltd., 2002
Masterworks of Instructional Diagramming
Some examples of paper model instruction diagrams are surprising works of art on their own. Rather than an afterthought or utilitarian necessity for building the model, these images can capture a bit of the anticipation of putting together a complex kit patiently step-by-step. While many builders might concentrate on the finished model, the instruction diagrams here are worthy of viewing on their own.
This church looks as if it is assembling itself from pieces falling from the heavens. The playful angles of the towers make this look like a fun kit to build rather than a difficult one.
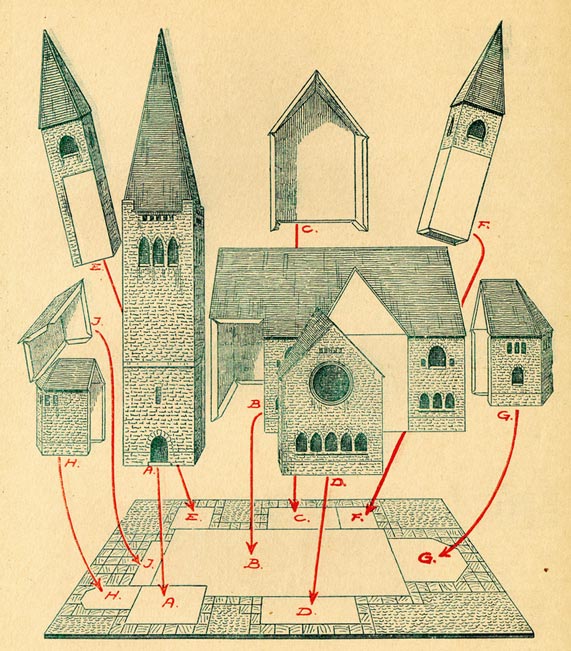
En monumental Kirke som Modelkarton instructions, Hans Christian Madsen, Illustreret Familie Journal, 1929
The straitforward and plain layout of the pages of this tank model make it look like a dull and uninspiring project. But the loose instruction sheet added at the end tells a different story of visual excitement and drama. The diagrams and subdiagrams can hardly contain themselves from explaining how they all work together to make the completed model.
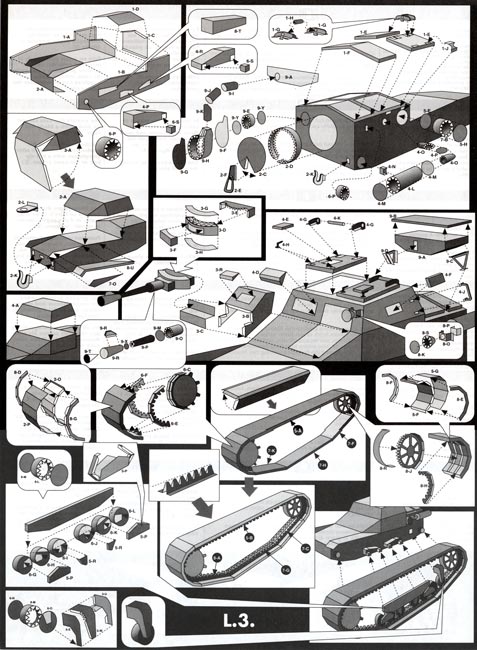
C.L.3. Light Armored Flamethrower instructions, Chema Alvarez, Ediciones Alcan S.L., 1993
This tugboat model includes a wordy written account of how to build it in German, but much more interesting is the fabulous exploded drawing at the end. To show all the pieces, different levels of the kit are drawn at different angles and perspectives. In the drawing the boat is suspended between assembled and disassembled, steaming full speed ahead, surrounded by a cloud of parts and possibilities in other dimensions.
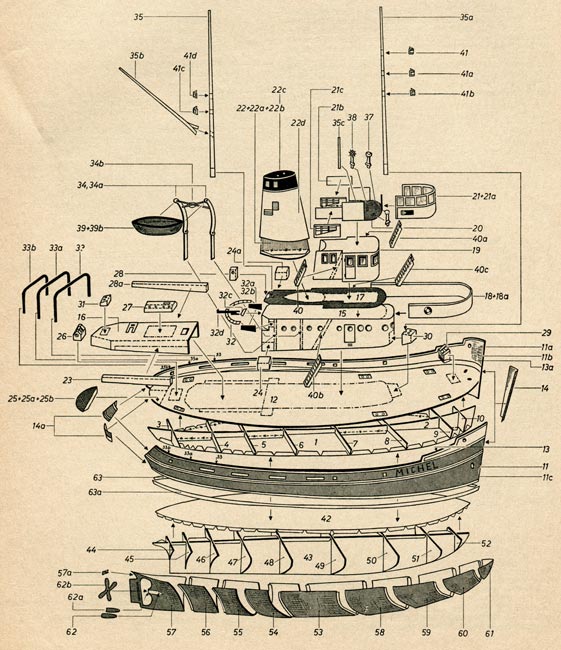
Hafen- und Seeschlepper Michel, Schreibers Modellbaubogen
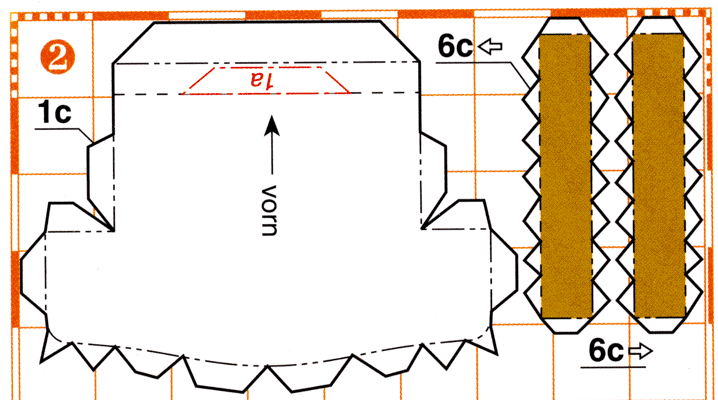
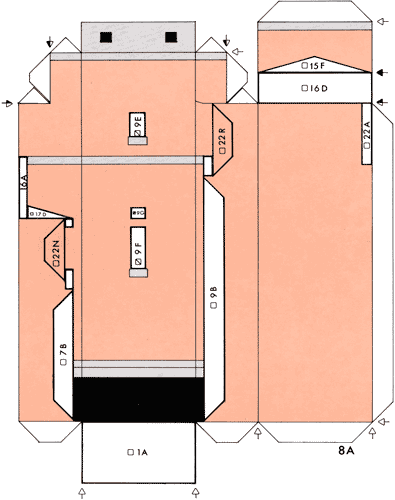
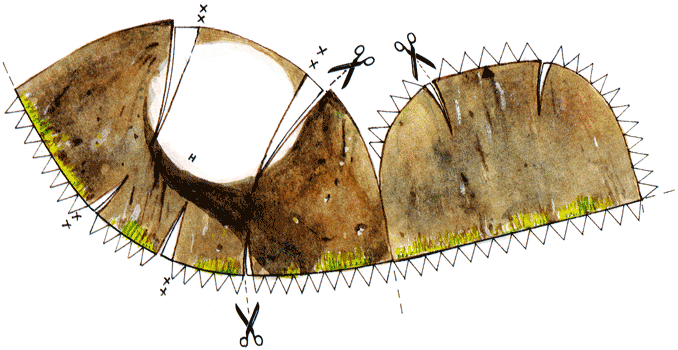
The instructions for this tiny dump truck model are a masterpiece of multiple layers of meaning without words. The top part explains the process and techniques through loose cartoons, but the bottom shows the placement of pieces with precise drawings. Numbered and lettered bubbles in different colors group parts into subassemblies. There are numerous places in the process where the builder can choose to go one direction or another to build a simple or complex model. The diagram suggests tools to use, tips on construction and even doubles as a full-sized pattern for cutting supplemental pieces. Instead of a chore of effort, putting this little truck together seems like an exciting and dramatic project you'll want to begin immediately.
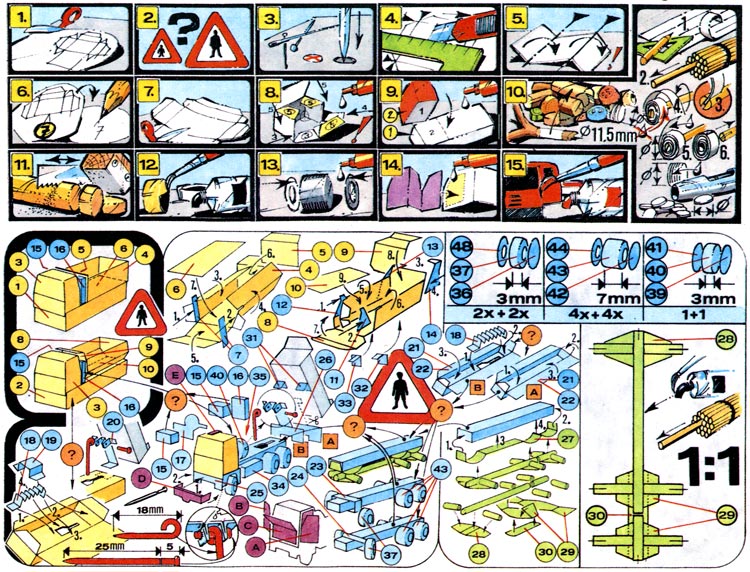
Tatra 815 S3-S1, Weiner Design Studio, ABC Minibox, 1992
![]()
©2025 Matt Bergstrom